Tom Judd <<<>>> Hiking Equipment
This is a work in progress
Equipment
Introduction
I do not want to tell you what you already know; nor do I want to re-hash packing lists that you can get elsewhere (e.g. browse for 'Ten Essentials'). Rather, I want to present items that have been useful to me in a way that may help you.
Hiking Pole
Hiking Poles are fairly useless. You can easily get by without them if your path is all trail. Research shows that you actually use more energy, not less, when you hike with a pole. They tie up your hands. Try taking a picture, unwrapping a candy bar, writing a note, or checking your compass with a pair of poles in your hands.
So, why bother?
In my experience, these are the cases where a pole is helpful:
- Stream crossings
- Steep descents
- Snow
- Downhill Ice
- Off-trail
I do a lot of off-trail hiking, so the last item is the most important one for me. So, I take a pole.
I get a lot of comments about my hiking pole. I made it myself out of one inch scrap aluminum pipe. I think the material cost for the pole was less than a dollar. I cut off a length so that the pole is about shoulder high. I hammer one end flat, and on the other I place a rubber foot, as one puts on a kitchen stool. I use the flattened end on sand, dirt, and small gravel. Over rocky terrain, the rubber-tipped end goes down. It has remarkable sticking power on rocks.

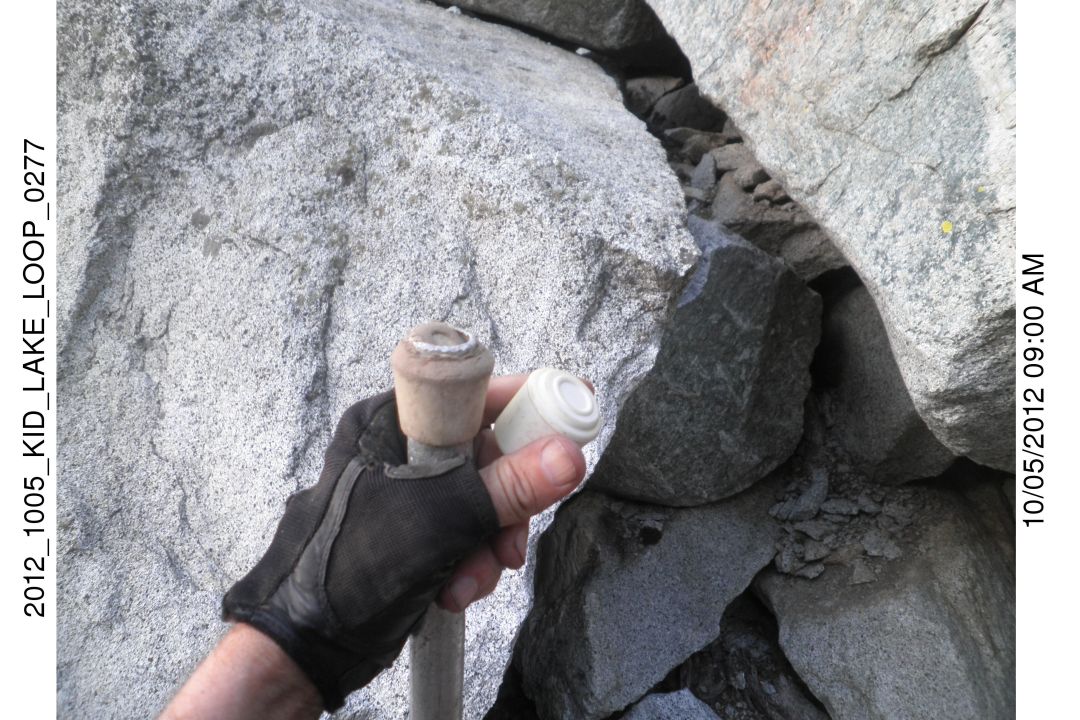
It is very light. My original pole complete with rubber tip weighs almost exactly one pound (450g). I have since lightened it by going to thinner pipe: more like shower curtain rod thickness. Its weight is 10.5 oz (300g). That is about the weight PER POLE of a typical dual-pole set. The pole is very strong. I use the flattened end to dig holes for human waste. I bang the pole on rocks to scare bears or to announce my presence to them; also to find a lost hiking companion. But, of course, the main use is for balance. Not so much on trails, but for the backcountry stretches that I do on every trip.
Dual poles predominate; I rarely see someone with a single pole on the trail. Two poles are better in snow and for stream crossings. But these are the exceptions. For for the most part dual poles mean twice the weight. So, however light one of them is, you have to double the weight. It is almost impossible to make a pair of poles that is lighter than my single long aluminum one. They certainly will not be as rugged. Try banging one on a rock
Hiking technique is more flexible with a long pole. I have no hand-grips, so I can slide the pole longer or shorter as the terrain changes. For example, when going down a steep set of steps I sometimes slide down the pole. You let the pole slip slowly thorough your gloved hand as you lean on it.
Best use of the hiking pole is off-trail. On my first backpacking trip we started off-trail going up Box Canyon near the Sugarloaf campsite. After only 50 or so steps I fell over. I stepped into a hole that was hidden by the grass. The backpack gave me a high moment of inertia, so it seemed to me like a slow motion fall as I toppled over. Thus, I learned quickly to probe with my pole the place I intend to step if something solid is not visible. This happens often when descending a steep brush-covered incline. I can shove my sturdy pole ahead through the tight branches. If it clinks onto some solid rock then I can safely wade into the brush.
The situation in which I am most thankful for a pole is when scrambling over a rocky slope. Sometimes the boulders can get quite large, so the distance between safe foot steps can be large. My pole with the sticky rubber end down, even on a flat tilted surface, creates the opportunity for a safety spot half-way between. Just remember that friction is greatest when the pressure is perpendicular to the face of the rock.
Support during stream-crossings is another critical use of hiking poles. Early in the season when the snow-melt fills the creeks, the rushing water creates dangers that take lives every year. In a strong flow two poles are better than one. That way you can maintain a stable three point stance (two poles and one leg) while taking a step. I will pick up an extra tree branch for the fourth leg when crossing a challenging stream. I never cross a fast stream that is over my knees.
I chuckle to myself sometimes when I see a fresh group on the trail who obviously went to REI together and bought all the same packs, and pads, and a pair of hiking poles each. They look like a caterpillar coming at you on the trail, with their poles gyrating with each step.
Water Jug
I always carry an empty gallon jug for getting water. One trip to the stream/lake gets me enough to sterilize drinking water, cook, and put out a campfire. Washing dishes away from streams and camp is easy when you can carry a jug of water with you. No soap or food gets put into the waterways. It is more comfortable because you can choose your seat. No bending awkwardly over a steep banked creek. It is so very convenient and weighs only 60g (2oz).
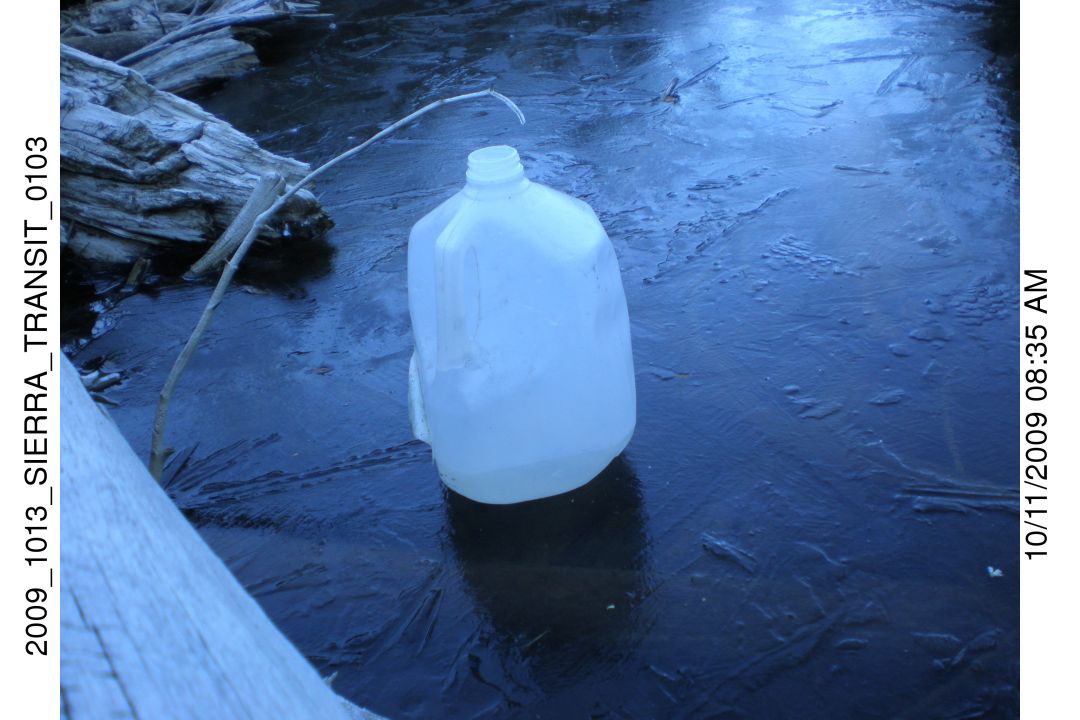
I attach the jug to the back of my pack. It will sometimes crumple up when I sit down; but that does not seem to harm it. It pops out for the next use.
Water will sometimes freeze overnight in the jug. Usually not a problem. Just shake it until all the ice can make it out. Only once after a very hard freeze did I have to cut the top open to release all the chunks.
Sat Phone/Communicator
I no longer carry a satellite phone. It has been replaced by an inReach two-way satellite tracker/messanger. I started using mobile communication in 2004 when I rented an Iridium phone for a 10 day solo back-country trip. I then purchased a Globalstar phone for 2005. The Globalstar was much clearer compared to the Iridium phone. But there were satellite holes. Sometimes I would try a half hour or more to get coverage. And, unbelievably, the phone would stop working in cold weather. Things gradually got better, and I had been using through 2016 when they doubled the airtime subscription price.
I saw the DeLorme inReach two-way satellite communicator as an attractive alternative. I was impressed when I saw a young woman texting her mother from the top of Mather pass in 2016. Both of my daughters had been using the DeLorme device, so I got one that fall. The long-term cost is cheaper than a satellite phone, even after purchasing the device. Garmin acquired the inReach device about that time, came out with their own model, and added $100 to the purchase price.
The sat phone weighs 13.2 oz (374g), the inReach 7.0 oz (198g). So there is a weight savings.
Tents
- Cheap Tents
- Expensive Tents
- Homemade Tyvek Tent
- Homemade Nylon (Orange) Tent
- Homemade SilNylon (White) Tent
- Homemade SilNylon (Gray) Tent
- Tent Construction Methods
Cheap Tents
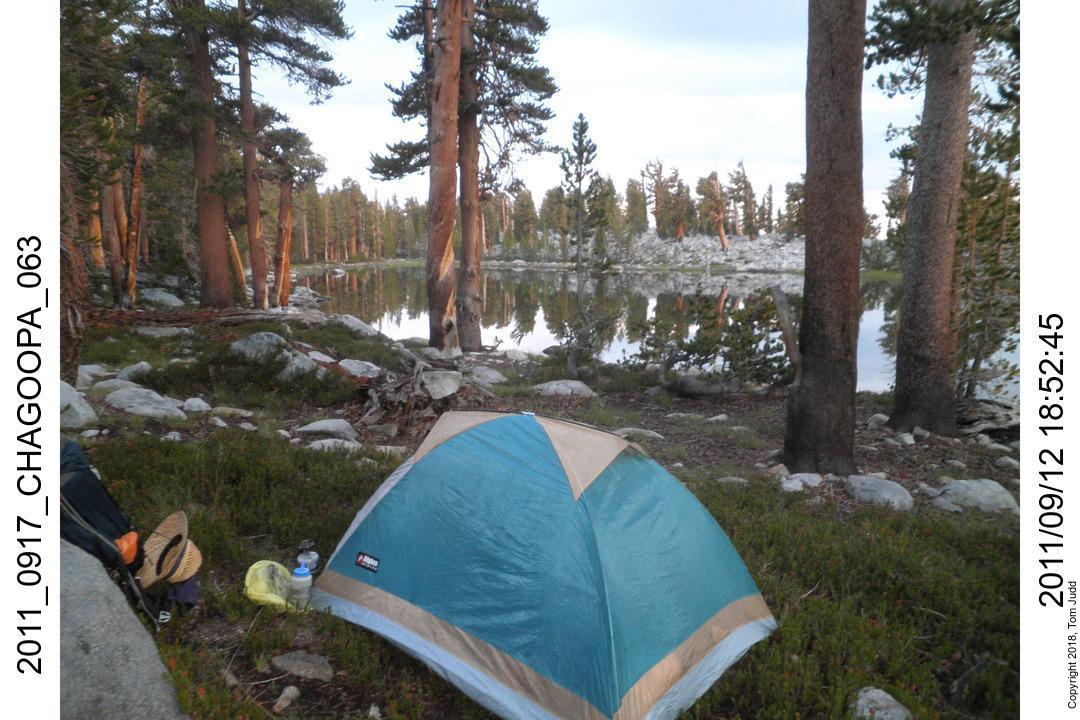
Tents cost too much. I go cheap. My favorite tent was a kid's 'Ranger' tent. I got it for $20 at a sporting goods store. It was made by North Point, a brand used by some Chinese company for distribution to American sports stores. It was supposed to be for two people, but they must have been midgets. I had to sleep diagonally. It satisfied my tent requirements:
- Weight less than 3 pounds (1.4kg)
- You can sit up in it
- It doesn't leak
The tent poles are inside, so there was no problem with trying to thread the pole through fabric tubes. I found a similar tent at Sports Authority that was almost as good. It leaked a little. Best cure for leaks is Tyvek tape. It is easier to apply compared to silicon sealer. The two tents are no longer made, but a similar one made by Ozark Trail can still be purchased at Walmart.
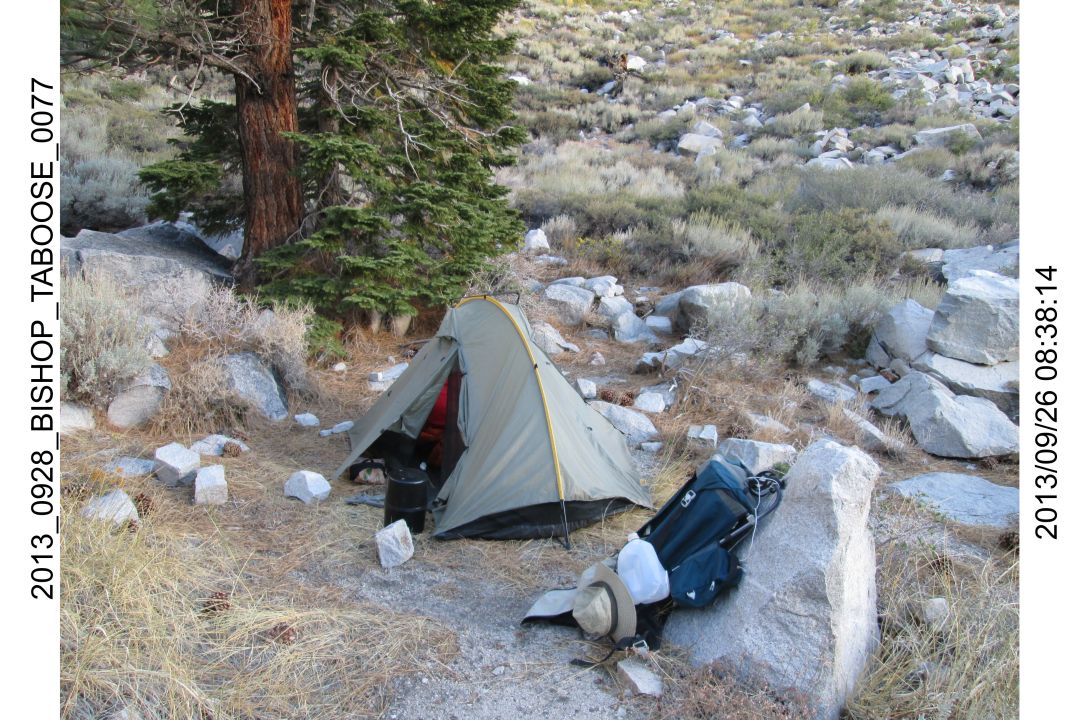
Expensive Tents
All my tents over $100 I have received as gifts (birthday/Christmas/Father's day) from my daughter. The first was a two-person tent from REI. It weighed six pounds; but Dale and I split the load. It lasted one night. A rugged trip through brush up Muro Blanco ripped it off a backpack on the second day. It was lost. We slept under a tarp for the rest of the trip.
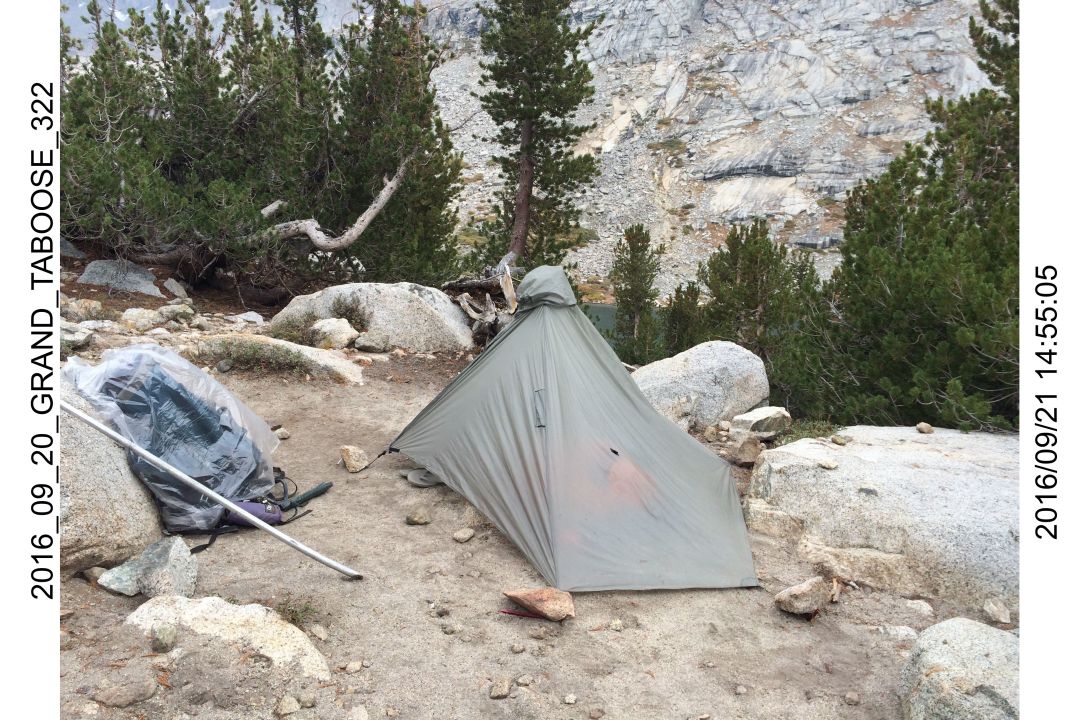
Another tent was a hand-me-down from my daughter: a Double Rainbow Tarptent. While it was well used when I got it, it is a rugged tent. Dale and I weathered a snowstorm in it. Other hikers said the storm broke their tent pole. That kind of event gives one confidence in the tent. It sleeps two, but at 2.6 pounds (1.2kg) it is light enough for one person. It is VERY roomy on solo hikes. It is a very nice tent. But at just under $300, I do not think I would have bought it on my own.
Another gift was the Six Moons poncho tent (Gatewood Cape $155). This is a minimalist tent that doubles as a rain coat. I use it in conjunction with a bivy sack (Outdoor Research Helium Bivy ($200)). I have used the combo on ten-day backcountry hikes (two pounds total). It is not convenient to use as a poncho. You need a hiking buddy to help you put it on. It is so light that it seems flimsy. But, it has done the job so far. It weathered a storm with 50-60 mph gusts (with the pole down for a lower profile). It is the lightest tent and has inspired me to make similar DIY tents.
Homemade Tyvek Tent
I built a tent out of Tyvek. It is very light. I modified my hiking pole so it split in two so I could use half of it for a tent pole. It was OK, but I used it only once. My Six Moon poncho tent and my homemade nylon tent are just as light and easier to use. So I use them when I am traveling light.

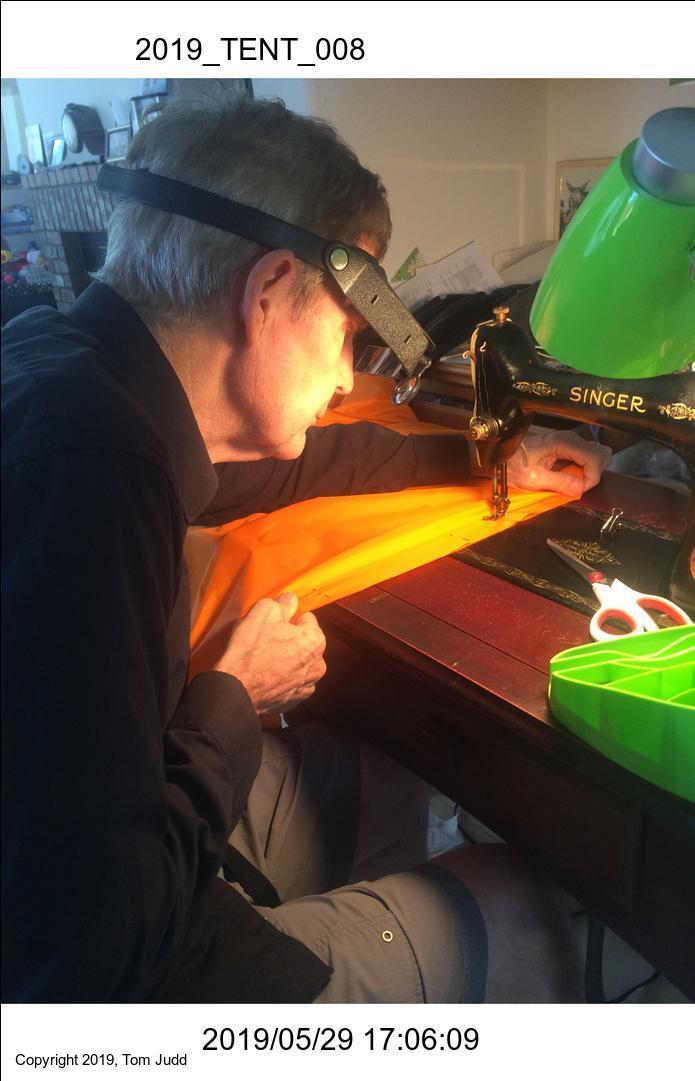
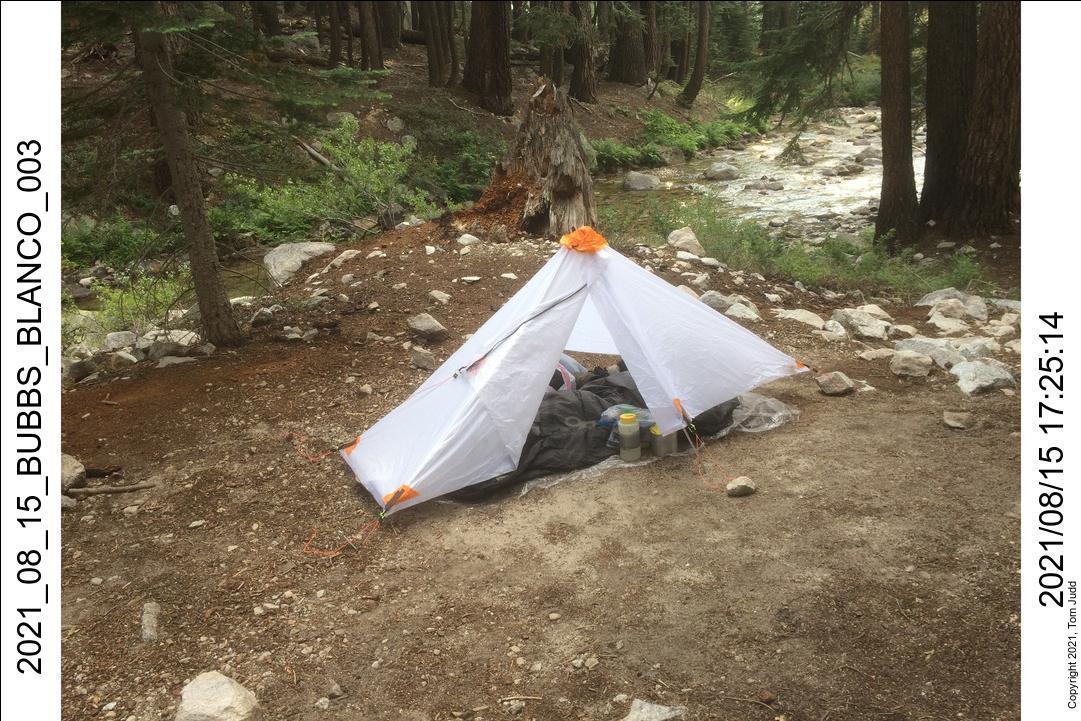
Homemade Nylon Tent (Orange Tent 2019)
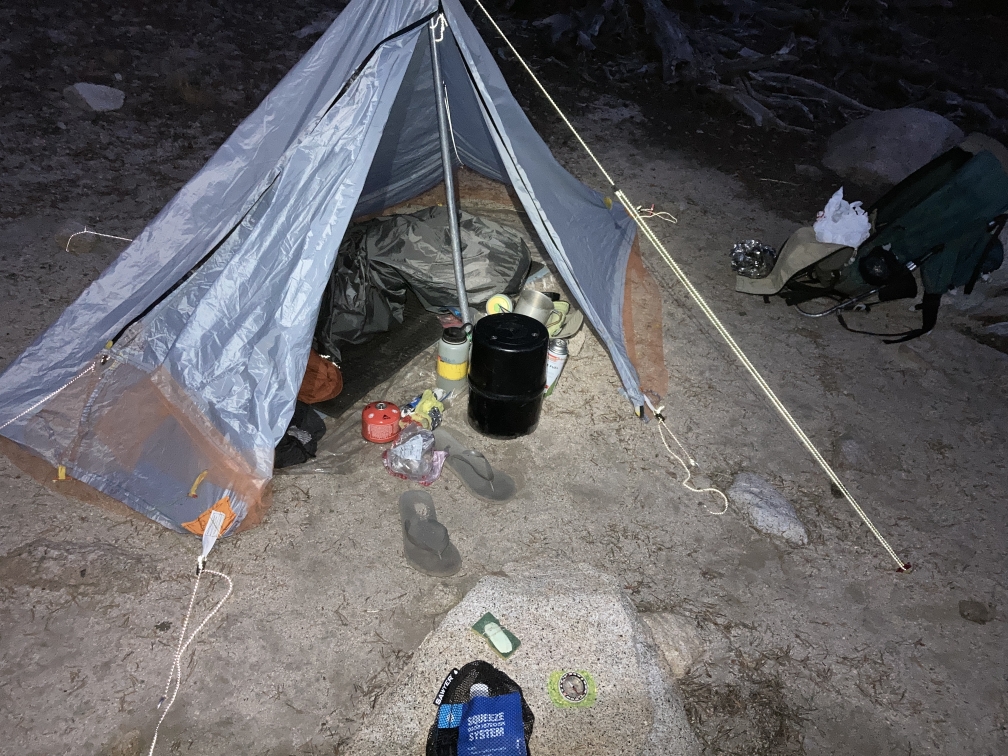
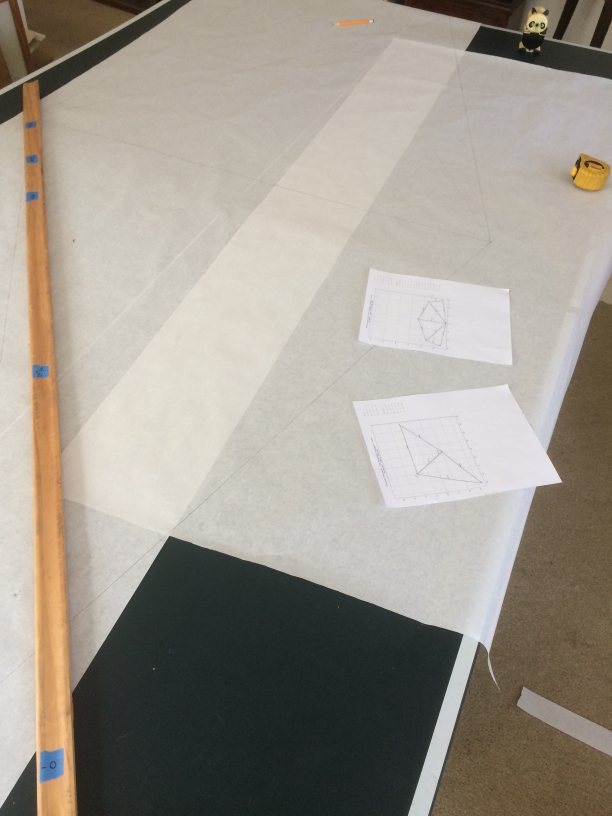
The Six Moons Cape tent sags. So I built a tent out of Nylon that uses my long hiking pole for a backbone. Also, instead of relying on tent stakes, I used nylon cord with cord stops at the corners. They create a quick way to put up a tent on rocky ground. Notice the tents in the above two pictures have rocks holding down the tent stakes. It is rare that I find a campsite that accommodates all the stakes, some allow none. I patterned the tent after the Six Moons tent. Instead of a zipper, the front flaps wrap around the front pole. That pole can be either a light aluminum rod, or a standard hiking pole. There are only two exposed seams. Each is sealed with silicon and taped closed. Very efficient. Complete weight is 1 pound 6 oz (625 grams) with the aluminum rod.
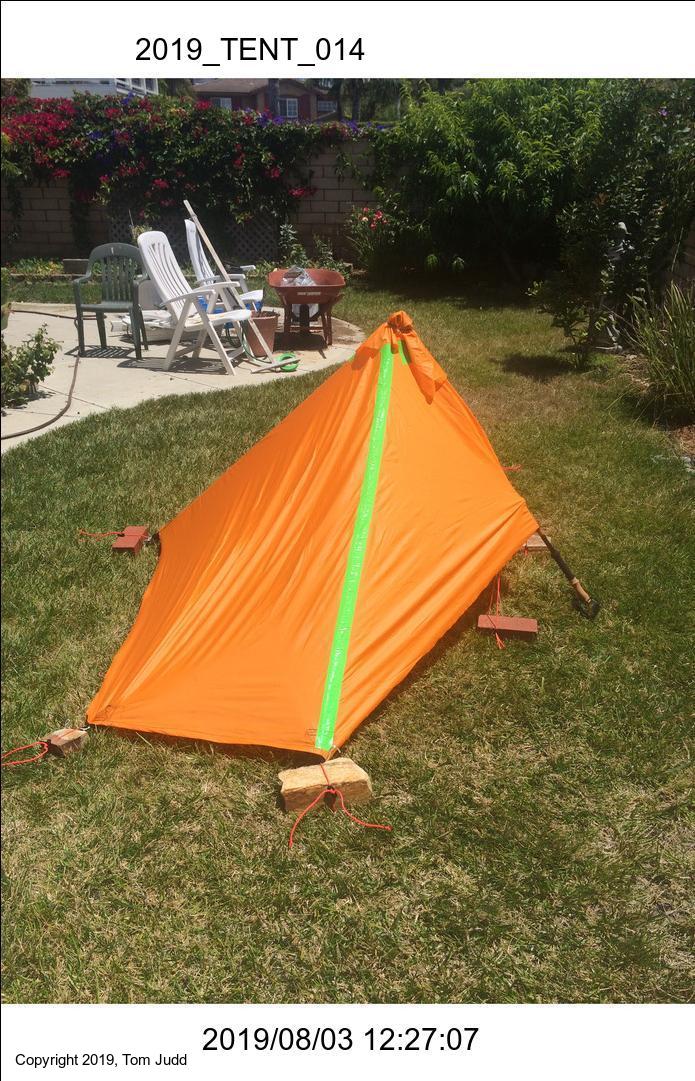
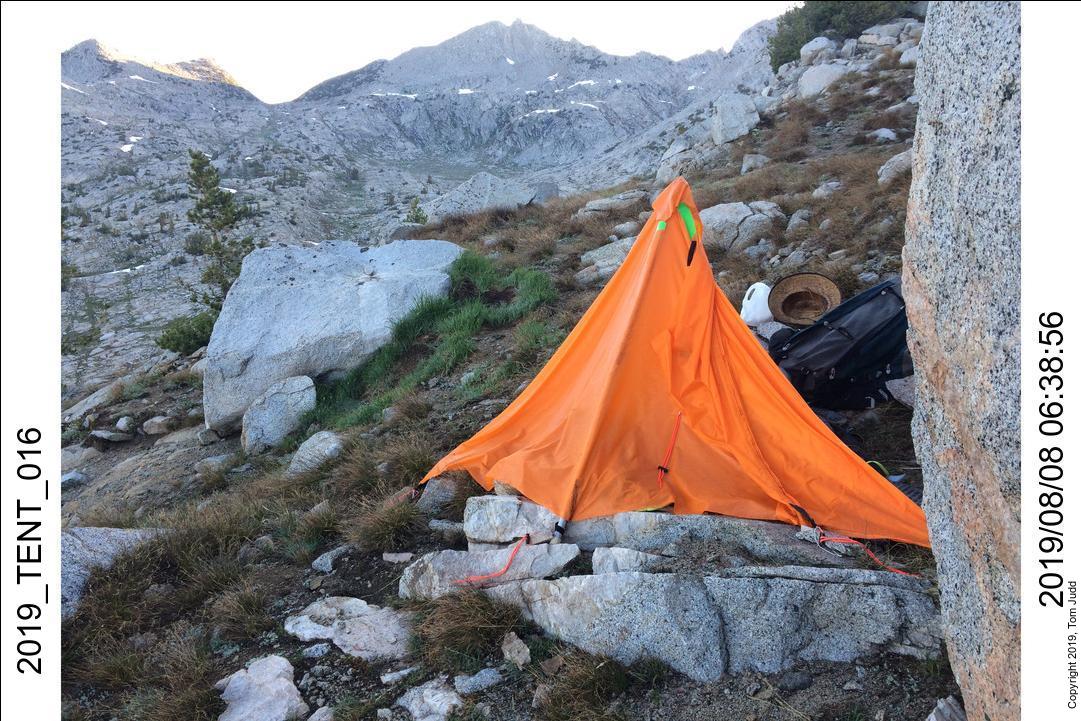
The tent performed very well. Above it is perched in a very difficult position: the only semi-flat spot around. I had no choice where the corners fell, so the ability to load them down with rocks was an important advantage. Notice, also, that the hiking pole backbone prevents the tent from collapsing inward. The orange color was applauded by the SAR rangers who were looking for me. I found the color annoying once inside the tent. I switched to white and gray for my next tents.
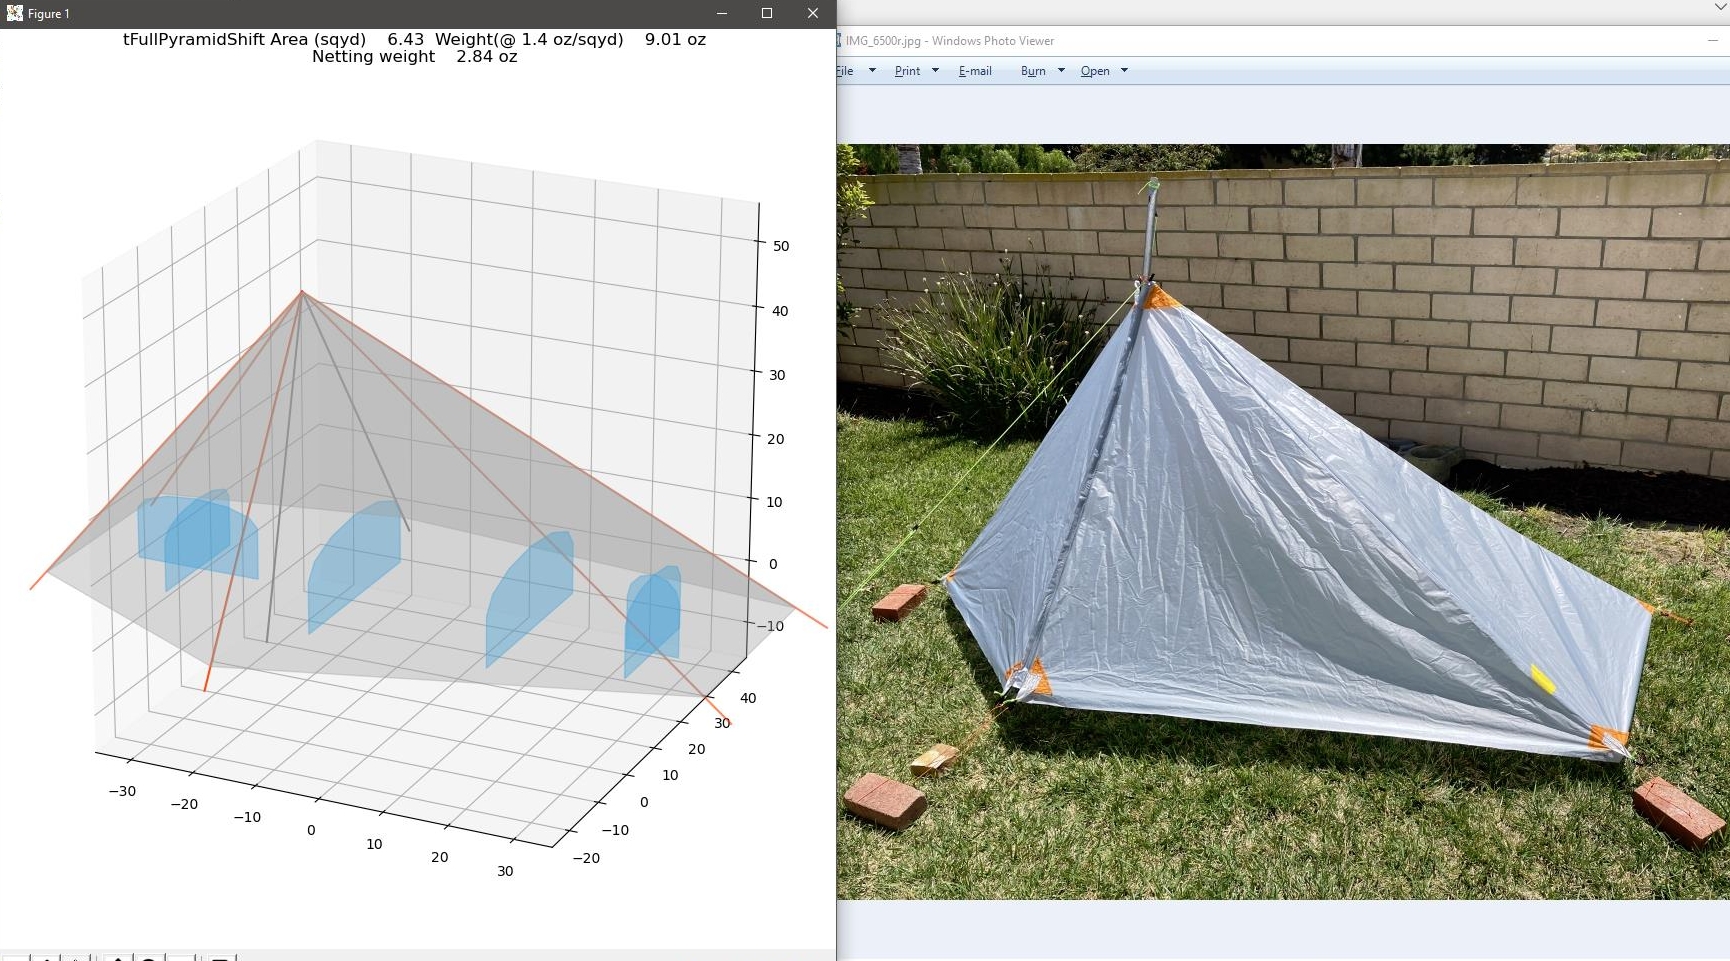
Homemade SilNylon Tent (White Umbrella Tent 2021)
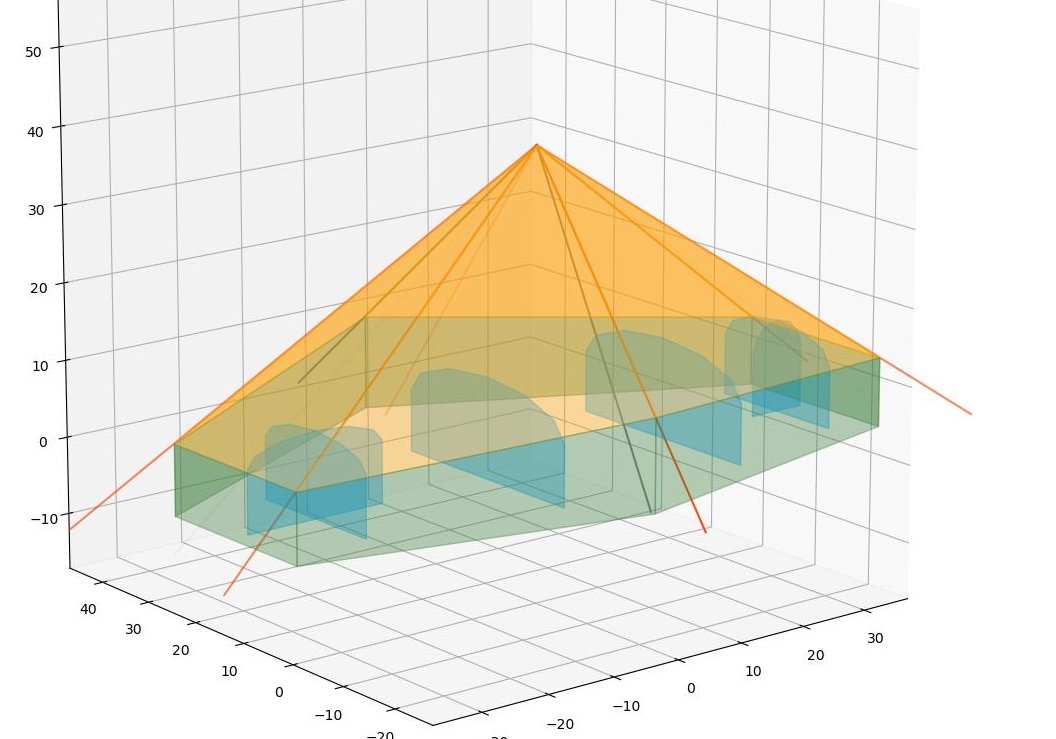
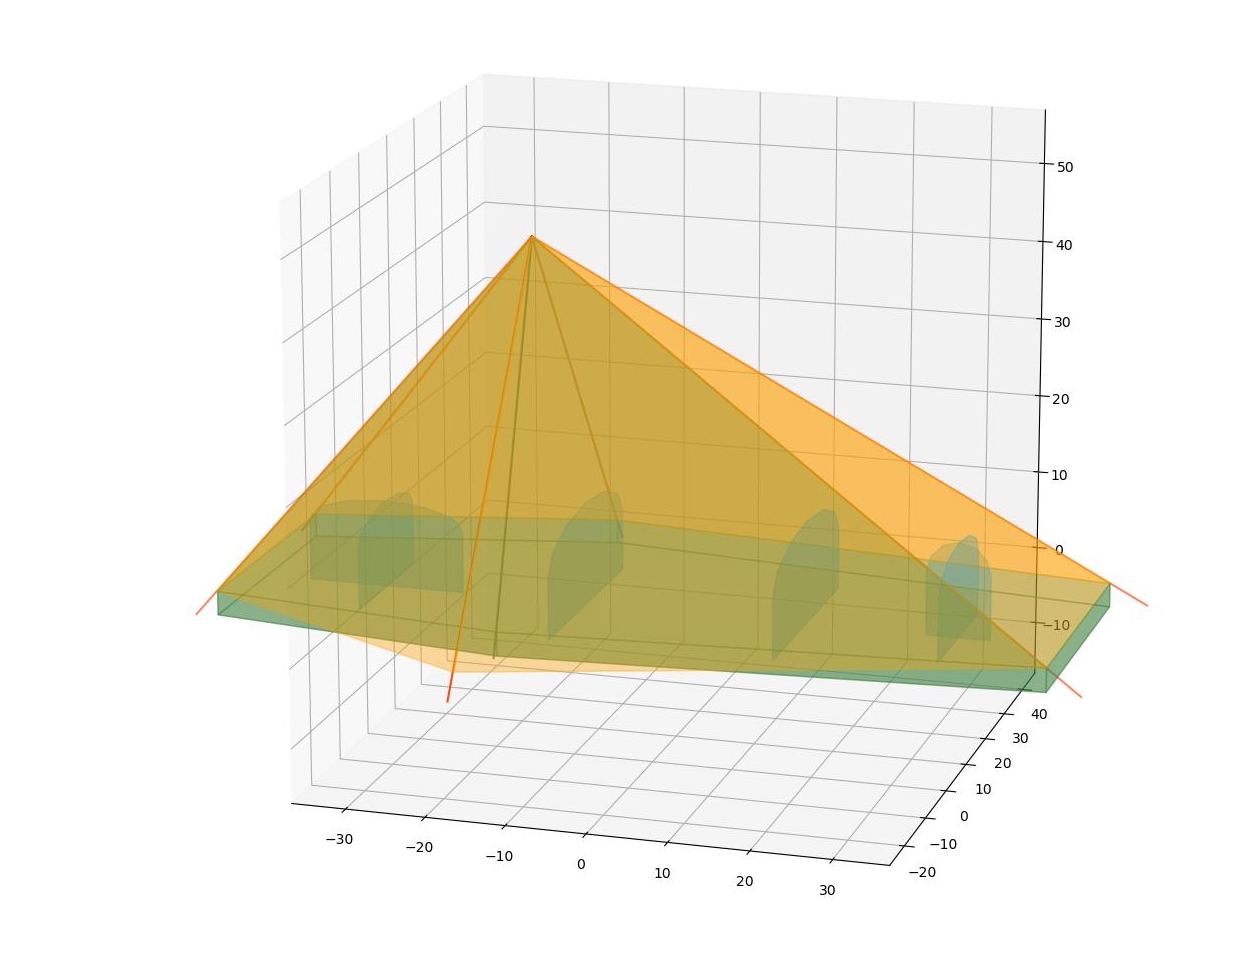
The Nylon Orange Tent above was patterned after the Six Moons Cape tent. But, there is no way to modify, fix, adjust the design. So I decided to write a tent design program. I actually wrote two. The first used the matplotlib Python routines to draw many-sided polygons that made up the tent panels. The problem was that these polygons were not planar, so they could not immediately be transfered to 2D tent material for fabrication. For my second program, I used a triangular grid for the sides of the tent. This was easy for a hexagonal tent (six triangular side panels) because the guylines defined the panel edges. For a pup-tent I programmed in a corner calculator that would work on straight or hyperbolic edges.
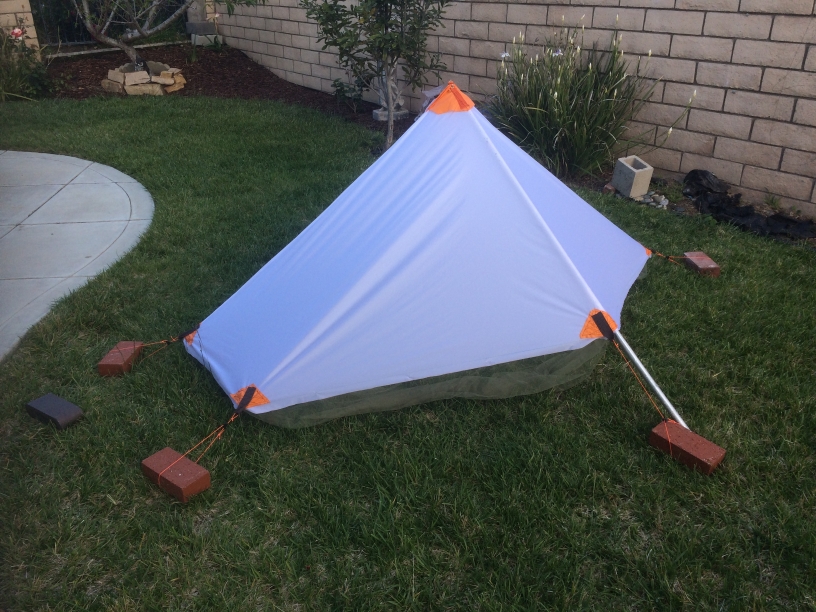
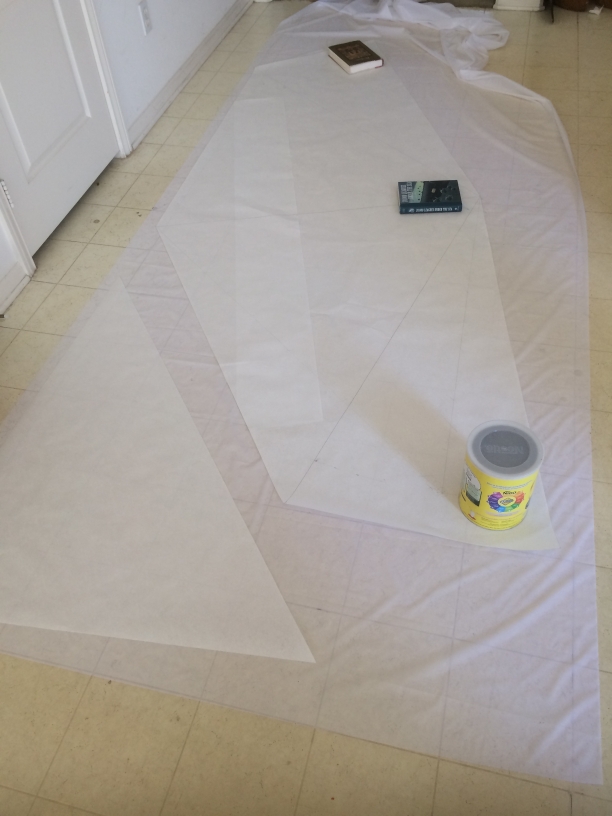
Tent is designed to use rocks at the corners so I bring only three stakes for convenience. Initial version did not have a zipper or netting. Current tent with these plus ground cloth (3M or FrostKing window insulator plastic) minus my hiking pole is 18oz (1 lb 2oz; 510g )
I expect to use a bivy sack inside the tent. The blue panels in the computer drawing above deliniate the outlines of a bivy sack with my Montbel down hugger sleeping bag inside. That is the advantage of doing it on the computer. You can tweak the dimensions till it fits. Fabric Weight is one of the variables that can be set in the program. So, it is easy to determine if 'larger' is too heavy.
The bivy sack should be sufficient protection from the elements by itself. The tent acts like an umbrella over the bivy to make living comfortable. In stormy weather the support pole can be reduced by a third. Besides a low profile to the wind, it allows the entire perimenter to be held to the ground. This helps keep out blowing rain and snow.
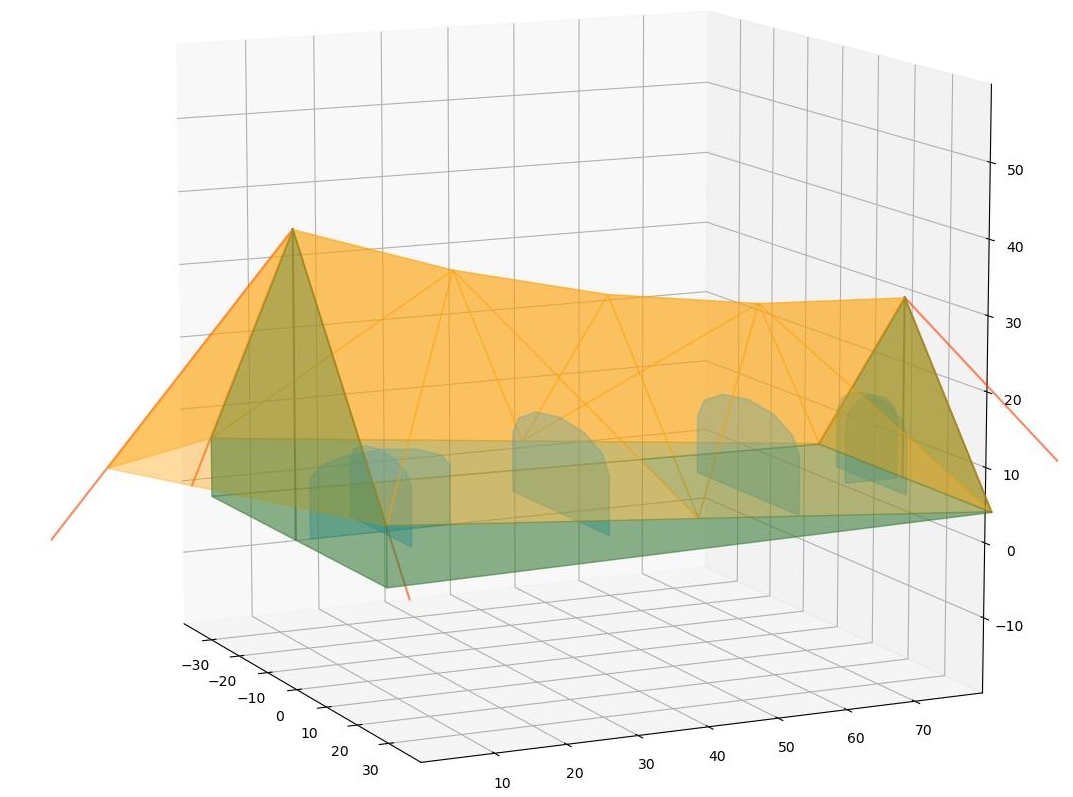
Homemade SilNylon Tent (Gray Tent 2022)
The White tent had two problems: bugs and breeze. The umbrella concept is fine, but it is high off the ground and so it can get quite breezy under it. Also, in the initial version, I had no mosquito netting around the periphery. I added the netting in January, but then decided that the best solution would be to make another tent with lower skirts.
This next tent is not symmetric, the pole is closer to the head than to the feet. Other features include:
- Mosquito netting made of very light tulle
- Two Internal Guy Lines
- Lighter Grosgrain ribbon instead of polyester straps for corner tiedowns
- Crossed Grosgrain at apex for stress relief
- Long (5 foot) hiking pole can be used for central tent pole
This tent is amazingly roomy yet very light. It weighs 18oz (510g) including stakes and plastic ground shield, not including my hiking pole. That is the same as the white tent! This one is much bigger. The weight savings comes from using tulle instead of real mosquito netting.
Tent Construction
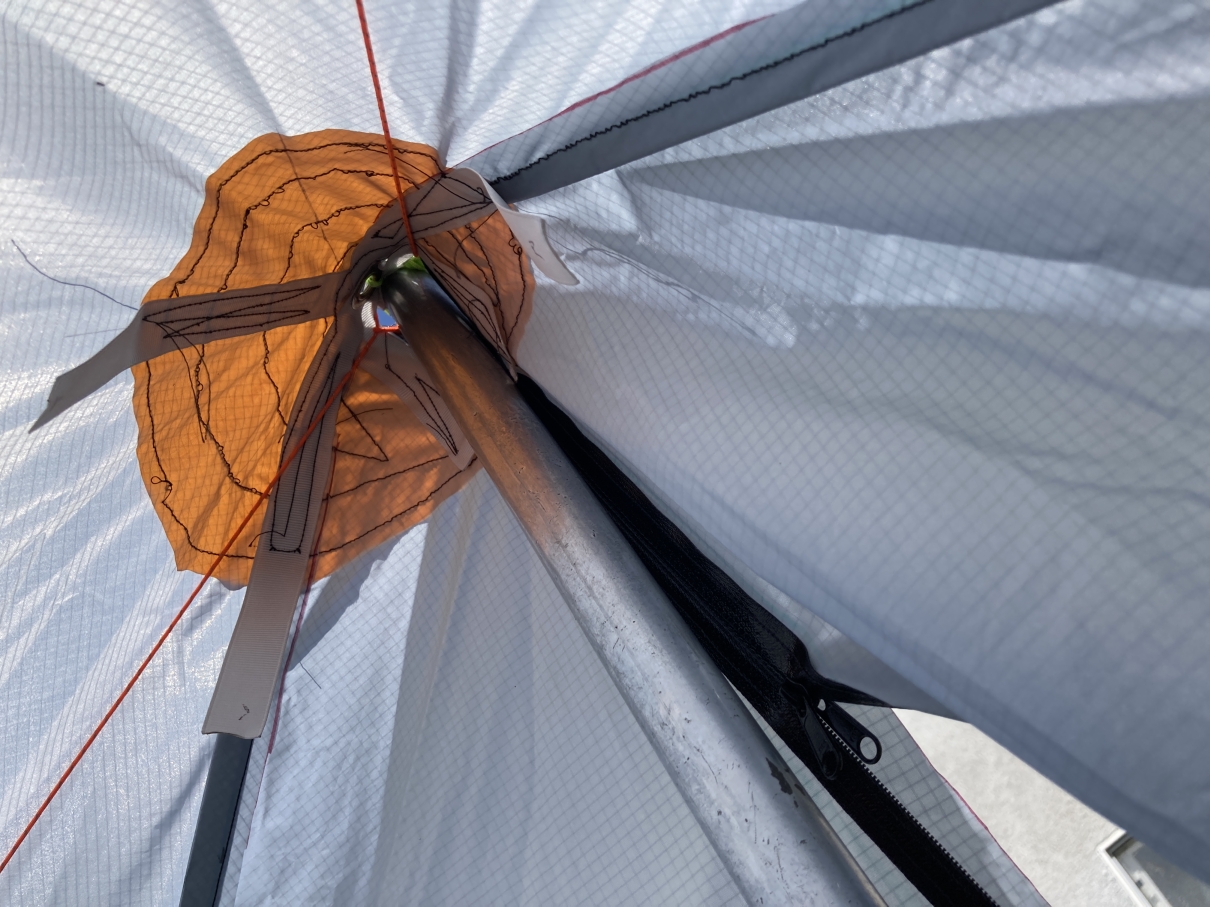
I designed the tent software to print out 2D plots which could be used to create the patterns for cutting the silnylon. Each vertex of the triangular panels is assigned an X,Y in position in inches, and each side of the triangles has a length in inches. Given a baseline with one side of a triangular panel, the other two sides can be constructed by drawing arcs of the correct lengths from the two ends of the first side. The intersection of the arcs is the third point of the triangle. I used a length of wood molding as a ruler and marked the distances with blue masking tape, seen in one of the pictures below. The steps of transfering the pattern to paper, then to fabric is shown below.
White Tent Pattern
Gray Tent Pattern

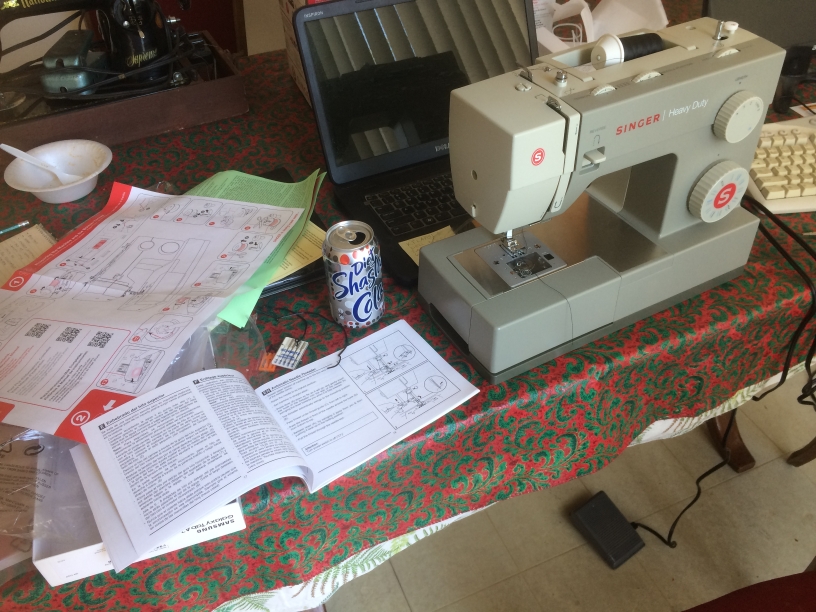
The sewing machine I used for White and the Gray tents was a step up from the antique I had used for the Orange tent. Kay received a new machine as a parting gift from a dear friend just before she passed. I use it with respect.
It is easier to use than the antique..fortunately. For SilNylon has proved to be challenging for a beginner like me. The material is so slick that when placed flat on a table the whole piece will slip to the floor if a small piece of it is left hanging over the edge. The material is stretchy too, so you have to keep your hands close to the foot to constantly guide it under the needle. And it is thin. Sew a joint and stretch it and the needle holes will open up. Not good for a tent.
The recommended stitch was the French fell seam. I tried it, but the material is so fragile I couldn't carry it through the many steps needed for the seam. So, I invented my own seam: Make an initial line of stitches about a third of the way from the true line with the good sides facing eachother. Then peel the 2/3 ends back over on each side and sew a second line on the final seam. The material is so sheer there is no problem seeing the marked line through the material. I ended up with a seam that is simple enough for me to do yet is strong: four layers of cloth. The exterior looks like a butt joint. It must already have a name.
Future Tents
The next level of tent design is one that has a net all along the open side. This would allow the tent to be opened for ventilation without opening the mosquito net. The gray tent has only a skirt of netting so when unzipped the bugs can come in. It has not been much of a problem yet, and it is lighter.
These small tents do have a condensation problem. The white tent is designed to be high off the ground to encourage air flow. The tents below have been inspired by some other tents I have seen.
I may just stick with the current white and gray tents. We'll see.
Sanitation Equipment
It is really hard to keep clean out in the field. I notice this especially when I go to cook: no running water or sink, no place to put down a fork, no table, no soap, no clean bowls. So these are the little tricks I have found useful:
- Take Paper Towels instead of toilet paper. You can wipe your knife off after cutting salami or cheese, or place food on it. After it is too grungy for food, use it to blow your nose. And after it has dried out, recycle it as TP. I historically use about one sheet every two days. You have to trim the sheets sometimes so they fit into a standard large plastic baggie. I double bag the used TP to pack it out.
- Take the last sliver of a soap bar for cleaning. It is small, light, easier to use than liquid soap. Wrap it in a paper towel and it will dry out quickly on the trail.
- Use dual water sterilization methods. When I first started hiking I boiled all my water. Now that I am using
no-cook food I have cut back on the fuel I carry. I still boil
water that looks dirty (yellow or high in particulates), otherwise I use two of the following:
- Water Purification Tablets, e.g. Aquatabs (NOT Iodine)
- SteriPen
- Sawyer water filter
- If you boil water, put your (metal) cup and spoon in the pot too once or twice a trip. It cleans off accumulations
- Carry a small bottle of hand sanitizer for a quick cleanup. Be careful the first time you open it at altitude since the higher internal pressure may blow out more than you want.
Maps
I started hiking before smart phones and Google Earth were available. So, planning for hikes was done with paper maps. The two most useful were maps from Trails Illustrated of the Sequoia and Kings Canyon National Parks, and the US Dept of Agriculture/US Forest Service maps of the same. Later, as I hiked in the different areas of the parks, I would acquire one or two USGS 7.5' topo maps, especially useful for off-trail planning and use. Also, the Tom Harrison maps are excellent for an overview especially if you stick to the trails.
Topo maps come unfolded. When I carry them with me on the trail I fold them in thirds both vertically and horizontally. The result is thin and flat and can be slipped into a plastic zip-lock bag.
I became familiar with the digital versions of the maps beginning in about 1994 when I started working at Point Research creating personal navigation devices. I wrote software to display digital maps on portable devices (1994-1998). Digital versions of the topo maps (e.g. GeoTiff) are 10 to 30 Mbytes. That was huge at the time. It took hours to download these with dial-up connections. To display these I would use generic .tif format display software. For trips that spanned multiple maps I would display two different images and drag them close.
USGS dlgv32
For better manipulation of the digital maps I obtained source code for the USGS dlgv32 display software. That software morphed into the dlgv32 Pro software. But I had already made improvements to the original code that was more suited to my needs. These were:
- Configuration files for loading and storing a list of maps
- Load/Display/Store Waypoints
- Load/Display/Store Tracks
- Display the slope of a planned off-trail route
- Plot the elevation profile of a track
- List the total distance and elevation changes for each day's hike
- Fine control of zoom
- Unit goodies (feet/meters, UTM/Lat-Long, decimal degrees/dms, WGS84/NAD27, ...)
- Correct an error with the Albers projection. This projection is used with most of the digital maps I have for California Sierra country.
Besides the digital maps, the Dlgv32 package can also load elevations (DEM = Digital Elevation Model/Map). If both map and elevation files are loaded for the same area, then the map can be shaded. DEM's are essential for many of the features I am most interested in. I obtained most of the ones I used from the Cal State Northridge Geography department web site. I still download digital maps from https://www.topoquest.com/find/state.php?state=CA&start=L
Leaflet
I did not want to waste time writing map software to display my hiking routes on these web pages. I tried third-party Google, Gmap4, and CalTopo. All failed my wishes. I recently investigated Leaflet and found that a topo or satellite map could be generated with a few lines of code. So that's what I did. Examples can be found here and in the trip reports.
USGS National Elevation Dataset
Elevation change is more important than distance when planning a hike. This is especially especially noticable on the eastern slopes of the Sierras where you find many short but steep routes over the mountains. One can download high resolution digital elevations from the USGS National Map project. That could be gigabytes. Instead, I tried making calls to their Elevation Point Query Service to obtain elevations from lat/lon coordinates as needed. This worked..kind of. I found the service unresponsive at times. So, I programmed up my own elevation service. It was a multi-step process that went like this:- Go to The National Map (TNM) website and check elevation products (3DEM)
- On the map, zoom to the area of interest
- Check 1 arc-second DEM, (30 meter latitude resolution)
- Click radio button 'GridFloat' to get the zip file(s) which have .flt and .hdr files
- Download the files
- Obtain the Geospatial Data Abstraction Library (GDAL) in order to reformat the GridFloat data.
- Run gdal_translate (gdal_translate -of AAIGrid floatn37w119_1.flt AAIGrid_37w119_1.dat).
www.juddzone.com
Carlsbad, CA
USA