Tom Judd <<<>>> Hiking Food
This is a work in progress
Food Stuff
Requirements
Food constraints are
- The food should provide more than 2000 calories/day. Everyday life needs that much, hiking much more. If the calorie count does not keep up with expenditure, then at a minimum, you should not feel hungry
- The volume should be low enough that the complete food supply should fit into a bear barrel. A bear barrel is a requirement in parts of Sequoia, Kings Canyon, and Yosemite national parks where I do most of my backpacking.
- The weight should be low. With carbohydrates and protein at between 3 and 4 calories/gram and fats near 9 calories/gram, it is understandable that the percentage of fats would be higher in hiking food. It is no accident that the iconic hiking food, gorp, is made of peanuts (high fat), chocolate (high fat), and raisins.
- Packaging should be by day (or meal).
- Food should be fast cooking (to save on fuel weight). Consideration should be made for no-cook, no-heat food. Mid-day meals should not need cooking
- Food should be nutritionally balanced. But this is not absolute. Calories are more important than balance. Your body can adjust if it is only a week of hiking. Take some vitamin pills if you worry about it.
Tom's Formula
I have never relied on packaged freeze-dried meals (e.g Mountain House ® ). They tend to be expensive, and too salty for my taste. You have to watch out for the total calories; sometimes it can be low. I have known others to use them, but often fortified with other food (e.g. instant rice). A big advantage is that they need no cooking, so are easy to prepare. But, the same can be said for oatmeal. And oatmeal generates less packaging trash.
Instead of pre-packaged meals, I make my own. Most convenient are cereal grains. So, I developed a simple formula that combines grains with common foodstuffs to create practical hiking meals. When in doubt, when in a hurry, the formula gives me good healthy food in quantity that I can immediately package for any length of trip. .
The food formula below assumes you are going to be cooking it. These are all quick cooking, takes only about a minute after the water starts boiling. If you want to completely eliminate cooking, see the next no-cook section.
| Ingredient | Amount (grams) | Calories | Note |
|---|---|---|---|
| grain | 160 | 592 | Cream of wheat, Cream of Rice, Couscous, Quick Oats, Grits, MaltoMeal®, Instant Rice, Wheatena® |
| nuts | 70 | 425 | Peanut, Cashew, Almond, Sunflower Seeds |
| dried fruit | 70 | 245 | Raisin, Cranberry, Date, Apricot, Banana chips |
| dry milk | 70 | 252 | Nonfat |
| total | 370 | 1514 |
I simplified the food. Only four items and the measurements of three of them are 70 grams each. This makes it much easier when combining all ingredients into a bag. Variety is achieved by mixing the combinations so that none appears twice, unless you like it.
Daily food needs about a liter of water to cook, or ten liters for a ten-day trip. It takes about 15g of fuel to bring a liter of cold water to a boil and sterilize it or cook with it. That means you need at least 150 grams of fuel to cook your food. I used to use the Primus® type pressurized gas canisters that came in 1 pound and 8 oz sizes ( 450 / 225 gram ). But, pure butane is cheaper. The hair-spray style gas bottles are quite common. Coleman® has 227g of butane fuel in a 108g canister. Cheapest easiest place to get them is at Walmart. It takes only one canister to cook ten days of meals and have a healthy reserve.
Packaging: Do not use zippered/sealable plastic bags. The zipper and seal are stiff, do not fold over easily and so will occupy more space. You can use the plastic bags used for fruits and vegetables at the store. I use gallon sized bags (28cm x 32cm) designed for twist-ties. Once filled with food, I squeeze the air out, twist the bag, wrap the tail around and encircle the whole thing with a rubber band instead of twist-ties. I stick a 6 inch piece of masking tape to the bottom on which I list the ingredients.
A postal scale is essential. It should read in both metric and English units. Since all nutritional information on packages in the US is in calories and includes gram equivalents in the serving size, I have settled on calories and grams as my units.
The formulary is designed for breakfast and dinner when it is convenient to handle and cook bags of food. So, it doesn't include the total required calorie intake. For lunch/breaks/snacks I include the equivalent of two Snickers bars (250 calories/bar, 53 grams/bar).
| Ingredient | Amount (grams) | Calories | Note |
|---|---|---|---|
| Formula | 370 | 1514 | |
| 2 bars of candy | 106 | 495 | |
| total | 476 | 2009 | About a pound of formula per day |
This is adequate for normal daily activity, but additional calories are needed to allow for energy used with heavy hiking.
The above is calculated by day. Additional food, packaged by trip, adds to the daily calorie intake. The list is below. At the bottom I added them all together with a grand total calories/day based on ten days.
| Ingredient | Amount (grams) | Calories | Note |
|---|---|---|---|
| cocoa mix | 250 | 915 | cocoa 150g, milk 100g |
| coffee | 240 | 739 | instant coffee 40g, milk 100g, sugar 100g |
| sausage | 140 | 540 | Four Jimmy Dean® precooked patties |
| butter | 113 | 810 | one stick, quarter pound |
| trail mix | 227 | 1101 | Walmart® packaged trail mix |
| support food sub total | 970 | 4105 | |
| Ten day formula total | 4760 | 20080 | |
| Ten day grand total | 5730 | 24185 | Average about 4.2 calories/gram |
| Standard Formula Food per day | 573 grams | 2420 calories | About one and a quarter pounds per day. |
Notes:
- Volume of Cooked Grain: It is hard to eat much more grain because of its volume once cooked with water. I have found that it is very easy to feel full while hiking even though you are burning more calories that you are taking in. It generally is a challenge with my hiking buddy to finish off the last bit of couscous. For me, calorie deficit is not usually a problem, since I am always fighting to loose weight anyway.
- Butter: My Formula is low in free fat, fat is mostly bundled up in the nuts. Therefore, when I go to wash the pots, they mostly rinse out easily with water. No soap is required. To consume butter with hot cooked cereal, just follow a spoonful of food with a bit of butter, sliced with your still warm spoon. The butter gradually melts as you roll the food around in your mouth. It is quite a delightful sensation. And it keeps your pots clean. The most butter I have eaten on a trip is 4 sticks (450 grams). I usually eat considerably less. During the warmer months you need to put it into a resealable bag. Otherwise your bear barrel becomes an oily mess.
- Milk: I use instant non-fat dry milk. There is a non-instant kind that clumps in your glass. Its advantage is that it takes up almost half the volume. I have gotten it in 28 lb buckets online from Costco. It is the cheapest. I currently use the instant type available online from Walmart. It is only slightly more expensive and I can decrease the volume considerably by whirling it in my blender for 20 seconds. Nido dry Milk (Nestle) is slightly more expensive but has some extra milk fat calories.
- Snickers: I have tried Babe Ruth, Payday, and Butterfinger bars. Snickers is my top pick. I get them in bulk; pack 20 bars on a ten day trip. A good second is the Kirkland (Costco) Nut-Bar. It is 10 grams lighter and 40 calories less than a Snickers, but is a welcome taste change. Clif bars are good, but they are expensive; and have 3.4 to 3.7 calories/gram vs 4.7 calories/gram with Snickers. Nevertheless, they are tasty: I have made Clif bars at home. They turned out well. Recepie on the internet.
- Bulk Food: If you are attentive, you can get some good deals in nuts and dried fruit at stores that sell these in bulk from bins. Be careful about nuts since they can get rancid. Sunflower seeds seem to be particularly susceptible; I always buy those in cans or jars.
- TVP Texturized Vegetable Protein (soy): Substitute for milk if lactose intolerant; substitute for nuts if allergic to them.
- Other Food that I take when I have room
- Hershey bars: Great for dessert
- Dehydrated fruit and vegetables: These add some interesting flavors to generally bland grains. See the dehydrated food section.
- Spaghetti: Angel Hair Pasta for quick cooking, my own dehydrated meat and tomato paste, spaghetti mix, cheese.
- Homemade Orange Candy: Dehydrated orange 20g, sugar 50g, butter 60g (half stick). Designed for calories.
- Dehydrated Soup: I have mixed these in 50-50 with grain and leave out the milk. Bean soup and chili sometimes cause gas. This can be disconcerting while hiking because it feels like the beginnings of something worse you might have picked up from bad water
- Flavored Oatmeal Packets (blueberry, strawberry, peach, banana): These provide some zing when combined with the rest of the ingredients. One packet adds about 130 calories and 35 grams. Half a packet works too. There may be problems with coordination of the packet with other dried fruit.
- Unused or Seldom Used Food: Other Items that I used to take regularly, but no longer do are
- block cheese: I used to take a half pound (250g). Now, just some garnish for my spaghetti. As a snack, it has been replaced by Snickers
- dry sausage: Snack supplanted by Snickers. Salty oily foods give me heartburn
- tuna: it comes in aluminum-lined pouches (also albacore etc). It is heavy, so I try to eat these first. The leftover packaging is problematic: bear bait. I usually try to burn the package and always retrieve the aluminum residue afterwards
- granola bar: Snack, OK for short trips, but takes up too much room.
- peanut butter: NEVER bring peanut butter. Messy, smelly, bear bait. Dirties containers, knives, fingers. Use peanuts instead!
- Pop-Tarts: Snack, tasty, dense, but cause heartburn.
- Pasta: takes too much fuel to cook.
- Bacon: pre-cooked packaged. Expensive.
- Pancakes: This worked once in fifteen years. Takes a lot of extra equipment, uses up a lot of fuel. But, they were good
Example Food
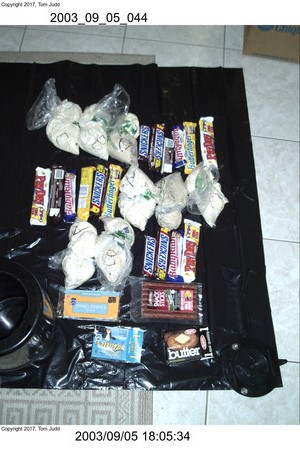
This is an early example of the food I would pack. This is for eight days. The Bear Barrel is half-seen at the bottom left. Four different daily packs are seen labeled A through D.
No-Cook Formula
This section could be called No-Heat since I always mix these up with cold water: no heat before eating. I use this formula for long trips because I can save the weight of cooking equipment and fuel. To pack the food as tight as possible, I need to blenderize the food. The texture of blended food would become an issue except for the nuts and dried fruit. They provide something to chew on.
The No-Cook formula is very similar to the standard formula with the following differences:
- Special attention with the grain since none of it will be cooked. So no cream of wheat or grits
- A bit of sugar seemed to blend in well
| Ingredient | Amount (grams) | Calories | Note |
|---|---|---|---|
| grain | 150 | 555 | Wheat Tortilla, Yellow Corn Tostadas, White Corn Tortilla, Ramen, Quick Oats, Instant Rice, Couscous, Tortilla Chips |
| nuts | 70 | 425 | Peanut, Cashew, Almond, Sunflower Seeds |
| dried fruit | 70 | 245 | Raisin, Cranberry, Date, Apricot, Banana chips |
| dry milk | 70 | 252 | |
| sugar | 10 | 37 | |
| total | 370 | 1514 |
Important: tortillas have to be dehydrated. Flour tortillas lose more than 25% of their weight when dried. White corn tortillas lose 47%! They are nearly half water. The yellow corn tostadas and tortilla chips come pre-dried. All must be put through a blender to reduce the volume.
To underscore the importance of blending the food consider the milk. Two cups of fluffy instant dry milk, once sent through the blender, will shrink down to 1.1 cup. This makes it much easier to pack the maximum amount of food in a bear barrel.
To prepare the food for eating, I use a small measuring cup to dish out the right amount into a plastic jar with a screwtop lid. Add a generous amount of water. View from the side as you stir it to make sure there are no dry clumps. Let it set. A minute or two for most will be enough. Couscous and instant rice take up to ten minutes.
To clean up afterwards, pour a little clean water into the jar, shake (with the lid on), then drink. A couple of cycles of this will do. These meals are low in sticky fat, so most debris just rinse off.
The flavored oatmeal packets do not seem to work as well with no-cook food.
Dehydrated Food
The best trail food for me has been dehydrated fruits, vegetables, and meat that I have prepared myself. I remember well the first time I tried my dried strawberries. It took about ten seconds for the crisp fruit to become rehydrated and then POW! My mouth was filled with the most intense and delightful strawberry flavor that I had ever experienced.
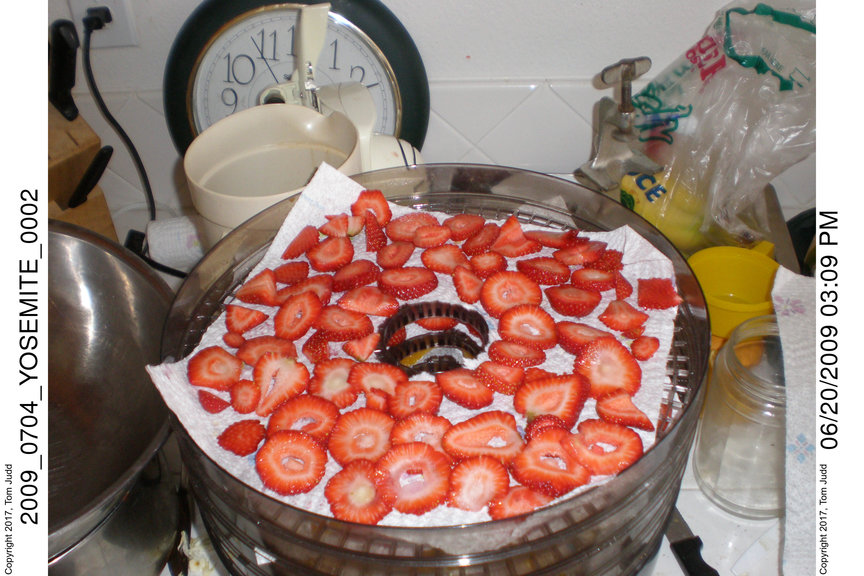
The dried food turns out very crisp. It is similar to a potato chip or a brittle dry maple leaf in the fall. For example, the dried apples I find in the stores are floppy; my dried apples crack like a taco shell when bent. The importance of thorough drying is twofold:
- It reduces the weight to the minimum
- It makes the food very resistant to spoilage
The total calories from the dried food is small. The value is in the taste and variety they bring to the hiking menu.
Dehydrated Food List
| Fruit | Note |
|---|---|
| Strawberries | Extremely tasty, most rewarding |
| Orange | Slice as thin as you can. Peeling before slicing gets messy. I break off the rind after dry. Very tasty, delicate, fragile fruit bursts in your mouth |
| Lemon | Strong! Eat only a tiny amount to clear the palate. Good for lemon tea after dinner |
| Lime | Same comment as lemon |
| Pear | Agreeably strong tasting |
| Peaches | Marginal Peaches taste good when dried |
| Apple | Easy to slice these thin. Pears and Apples take less work |
| Vegetable | Note |
| Bell Pepper | Easiest Vegetable. Slices thin, dries out to very thin strings, bursts with flavor when eaten. Red and Green are very different |
| Yellow Onion | Another easy vegetable. Surprising because the sweetness seems more noticable than in raw onion. |
| Spinach | Another easy vegetable. Ultra crisp, delicate leaves. . | Tomato Paste | Spread one 12 oz can on three wax paper sheets that are trimmed to fit into the dehydrator. Monitor closely. Pull the partially dried paste away from the paper. Once completely dry the paper sticks. I use this mostly for spaghetti, leftover with other grain bags. |
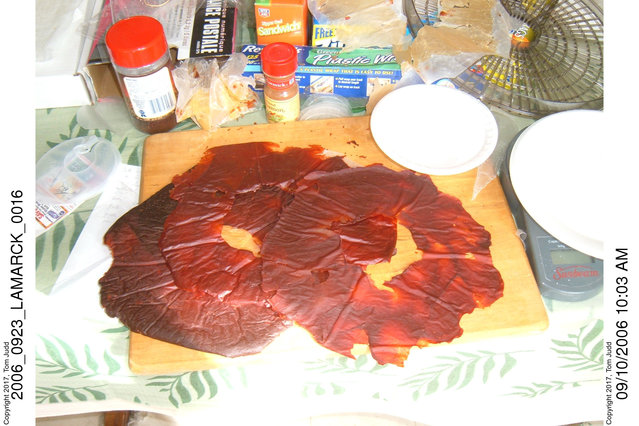
Spaghetti with dehydrated meat
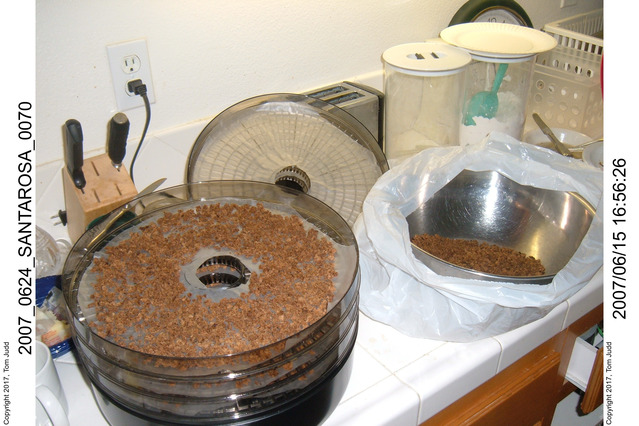
Meat takes a bit more preparation than fruit and vegetables. You have to cook it first. I start with 2-3 pounds of pot roast and cook for several hours, until it cuts with a fork. Remove all the fat before putting through a meat grinder. Grinding helps increase the surface area for quicker drying. Spread on paper towels in the dehydrator. The food in the dehydrator tray closest to the heating element will dry quicker, so I periodically rotate the trays. Stir the meat when you do this so that clumps of meat are better exposed. The product is crisp, light, pure meat. The volume of the meat can be reduced by putting it through a blender. The meat is unseasoned. I rely on the spaghetti mix for salt and spice. The meat goes in a baggy in the freezer until use. Besides spaghetti, I add it to other food bags in the place of milk.
The table below tracks the weight of the meat as it goes through the process:
| Step | Weight | grams |
|---|---|---|
| Packaged Roast Beef label | 2.44 lb | |
| Unpackaged, washed | 2 lb 8oz | 1134 |
| Cooked | 1 lb 7.7oz | 671 |
| After trimming the fat | 1 lb 5.8oz | 621 |
| After grinding. A half slice of bread follows the last bit of meat to clean out the grinder | 1 lb 5oz | 608 |
| After drying | 9oz | 263 |
You can see that the weight reduction is better than a factor of four.
Most often I use the meat in spaghetti. This recipe works for me, good for two people. If I am alone I will be eating this for a day. Leftovers have to go in the bear barrel, so I do not prepare this until half way through the trip when there is more room in the barrel.
- Spaghetti (angel hair): 150g
- cheese: 60g
- meat: 100g
- tomato paste (dried): 50g
- package of spaghetti mix: 40g
- beef bullion cube: 4g
Snacks and Hand Food
Between breakfast and dinner I need calories during the day while hiking. I do not want to stop to unpack my backpack or heat something up, so I rely on munchies I can carry in my pocket. I used to do sausage and cheese, but now tend to go with high-calorie hand food. Snickers candy bars have been the old standby. Two bars give 500 Calories. But ten days of Snickers can get tiring. So, I came up with three hand-food alternates shown below.
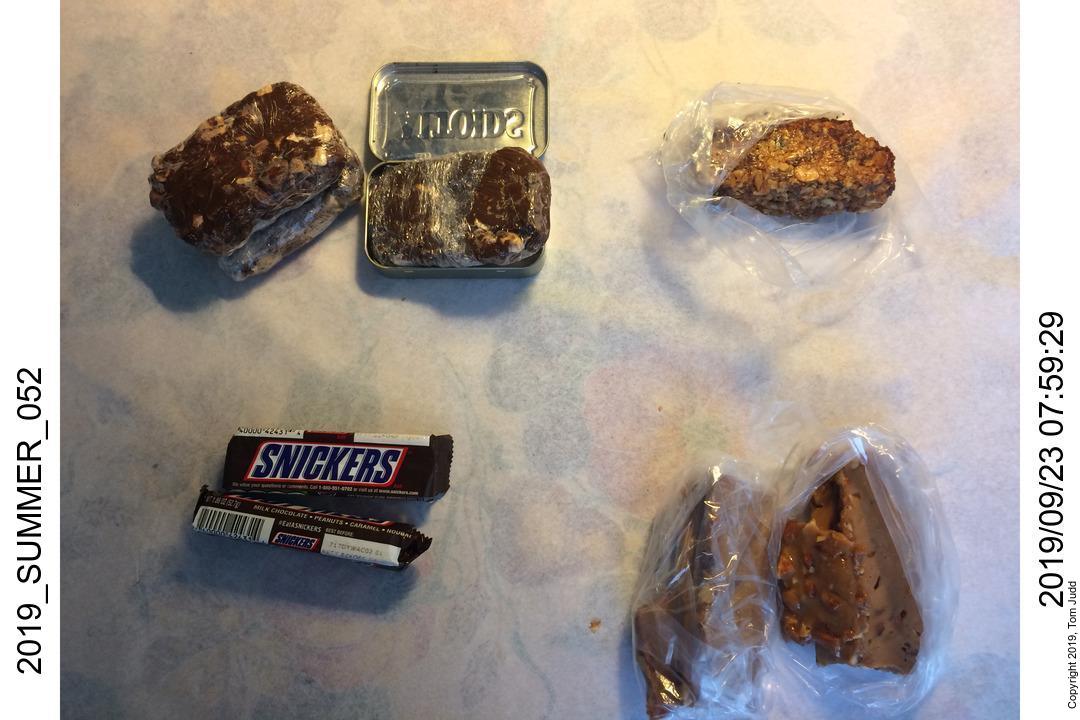
The goal is to have a convenient and pleasant source of 500 Calories. At 5 Calories per gram, 100 grams of the snacks will do the trick. I didn't like the mole-mole very much, it fell apart too easily. That is tough to handle with one hand on the trail. The other two were great!
Nut bar A cup of chopped almonds (130g), a cup of chopped cashews (125g), and 250 grams of broken bulk milk chocolate. Warm in a toaster oven until soft, then press 100 grams into a form lined with cling wrap. I used a metal breath-mint can, see the picture. These are similar to 'Kind' bars or the nut-bar equivalent from Costco. This recepie is higher in chocolate, you can probably cut it by half and still have it stick together. The cling wrap is ultra useful. I can unwrap the bar, eat half, then wrap it up securely again. It will not mess up my pocket, nor will the wrapping fly around like the Snickers wrappers tend to do. This beats trail mix because the single bar is more manageable, and the wrapping keeps the food sanitary, away from your hands.
Nut crunch This is super easy to make: a cup of butter, a cup of sugar and a cup of nuts. Mix the butter and sugar together with a bit of water and heat until it begins to turn brown. Mix in the nuts and pour out onto a flat surface. Score into strips while it is still warm. Pack into 100 gram baggies when cool. I found this in The Joy of Cooking. I skipped the candy thermometer part because I needed an extra hand to hold it. I just stirred until it began to get carmelized. The butter stays locked in the sugar crystals until you take a bite. High calories and it tastes good!
©2017 Tom Judd
www.juddzone.com
Carlsbad, CA
USA